Friday, August 23, 2013

HG Blitz Game: SRA vs WFP Drop Bears

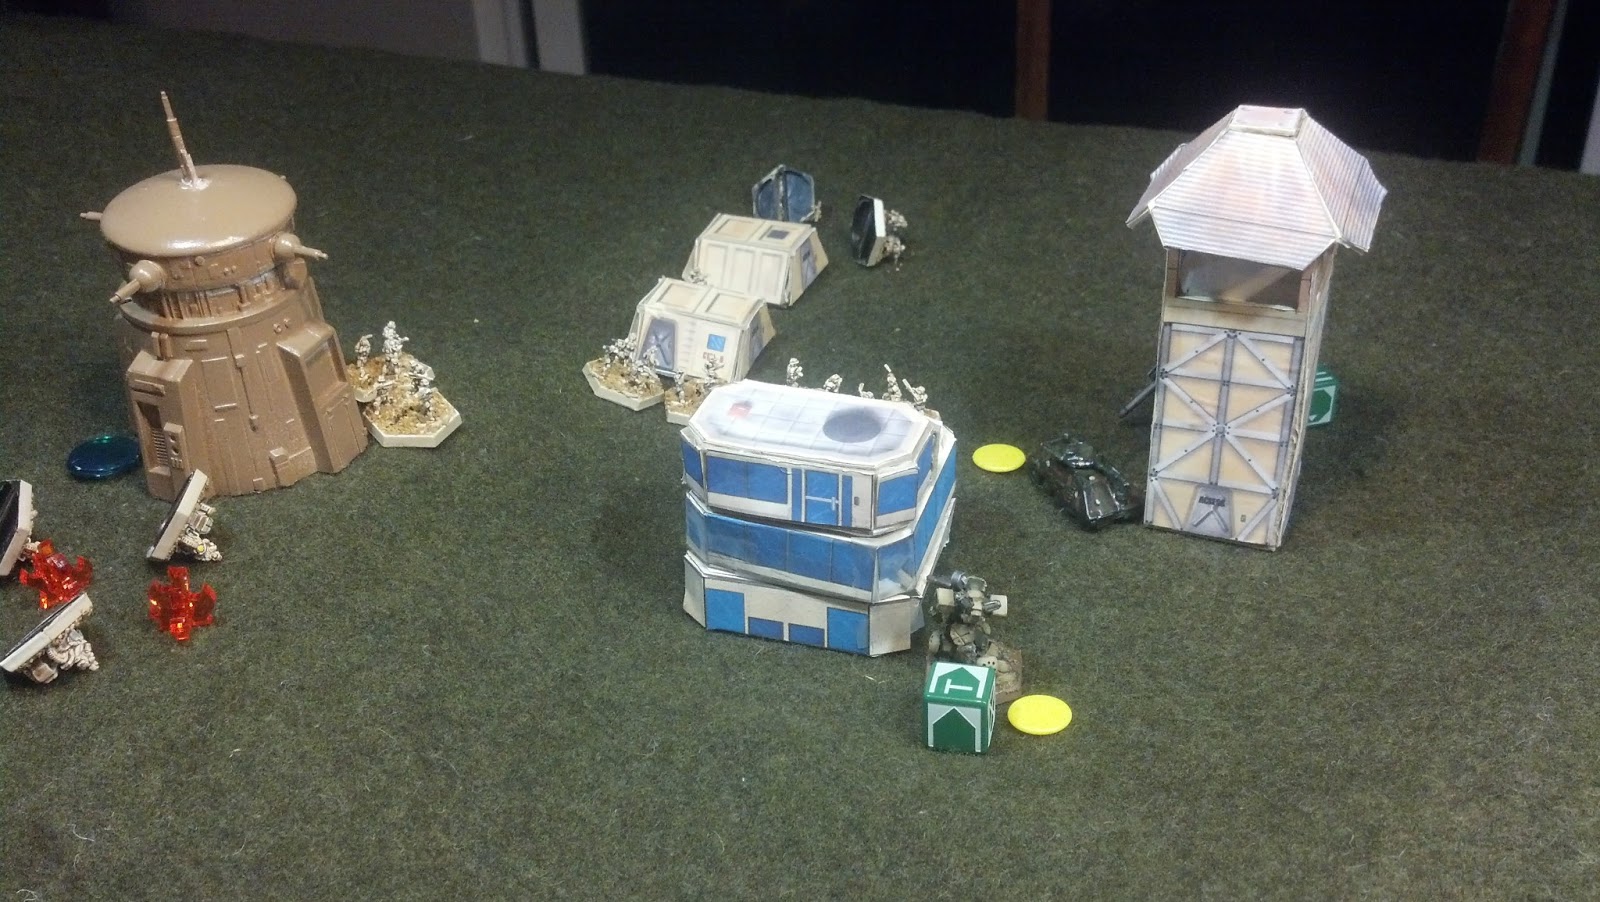
   A buddy came over and played a little game today.  He decided to play with a 550TV SRA force with a GP squad, a FS squad and a section of Elans with AT.  I used a Drop Bear GP squad and a Dragoon squad with some improved 3ATK/3DEF.  That made a huge difference and saved the game for me.  The SRA drew offense and chose to assassinate my Army CDR, Seize an OBJ (Bottle top on hill) and Destroy my Dragoon squad.
The SRA came across the board pretty fast utilizing ground movement and cover as best they could.  The Bears got off a few shots, most notably a couple LGL rounds flattened several bases of Elans before they brought their AGMs and rockets to bear.
The Dragoon squad held the OBJ, while I tried to flank my GP squad to the right and then bring them around to destroy threats to the OBJ.
I finally was able to stack the modifiers coordinated fire and crossfire on a SRA Cobra and brought down the beast in a volley of fire from the GP squad.  It is so entirely clear that maneuvering to maximize your modifiers is the key to success in this game.  SRA attempted to kill my Cheetah failed and instead decided to close and melee to slow down the GP squads flanking maneuver.  It worked pretty well and slowed down the Bears for two turns, but cost them several gears.
   The Dragoon squad fought tenaciously to hold the OBJ but SRA gears stormed the hill. In desperation, a Dingo charged the Cobra supporting the units on the hill.  His assault caused 3 boxes of damage with his Spike gun.  This ended up being the turning point.  The Dragoon squad regrouped and with fire from the GP squad started to eliminate SRA gears near the OBJ.  At this point it was clear that the SRA no longer had the ability to accomplish any of its OBJs any time soon and so we called the game.    A great game.  We continued to learn tactics and how to best utilize the army lists, modifiers and rules to increase lethality.  Hopefully, we continue playing every week.


Sunday, August 11, 2013

Heavy Gear Painting Update

So I took some time to start organizing and prepping my last remaining gears for painting.  I have had them sitting around for a long time (some for years....)
A Southern Strike Cadre with extra gears.  Allows me to change around the configuration of the cadre by just switching out gear combinations.  With these eight I can make Line, Brawler or Rapid Support Strike Cadres.  Gives me a lot of flexibility, but at the same time I can only field one cadre from them. Oh well.

My last two huns and my only Thunderhammer (a little present for my clearly under appreciated Northern forces)

Drakes....hhmmm not sure what to do with these.  One Command and one FS Variant

And my massive Northern point sink...three Mammoths.  I will play a game with all three one day

Thursday, August 8, 2013

Heavy Gear Campaign: Operation Sudden Fire Scenario 7 (Mission 2): In and Out (Solo)

After the random choosing of this scenario, I opened up the book and read through the scenario.  I thought that a win for the South would bring about a probable Southern offensive operation to capitalize on the new intel gained from the last scenario.  I was pleasantly surprised that the writers really thought this storyline through very well.  I really applaud DP9 for such a well through out product.  They need to restart making these scenario books in this manner and not the random and non-interconnected scenarios they now have.  The only issue besides the army building I have had in conversions comes in the way of the terrain. The two hex maps that come with the Tac Pack are used in every scenario, however they adapted the maps drastically it seems.  So sometimes woods are boulder fields and imaginary lines create plateau effects, as in this scenario.  This was a bit challenging converting to a viable replicated miniature table.  But I did my best.
Used a bunch of foam sheets and books, covered by my trusty old army blanket

View from on top of the ridge (Northern Deployment Area) towards the Southern deployment zone

Looking up the hill from the Southern position
    The background of this scenario is that the Northern Commander, after receiving the report of the failed intercept of the escaping Southern recon unit, decided to preemptively attack the Southern forces before they took advantage of the intel.  A wise move and uses a feint to draw off the faster and more dangerous gear squads from the South's main force, which (if you read the other posts, you will remember) is the remnants of a regiment.  Well , their heavy support (2 x Nagas) are left with a couple gears and some infantry in the rear as the rest of the unit rushes off to attack the Northern feint attack.  The North on the other hand has assembled an interesting strike force to attack and destroy the Nagas.  They have one Strike Squad of 1x Razorback, 2x Jags and 2x Strike Cheetahs, along with Recon infnatry, Heavy Weapons Infantry (Rockets) and a cool unit called the Armor Killers armed with AGRs and Rockets and JUMP packs!  I was having pictures of Heinlein's original Starship Troopers from the book "jump" through my head.  Anyways, here is where I made my mistake in translating data from TAC to Blitz or just conversion...  IN the Scenario book these infantry units are all just squads of 10 men each.  Well, I just decided for ease of conversion I would make every squad a platoon....oopps.  That would mean 5 x platoons of infantry in this game.  Well, if I don't know infantry rules by the end of this game, I never will!

Starting positions

As the Southern commander starting first I assessed the Northern infantry as my greatest threat, not the gears.  If I could keep them at distance and prevent close range attacks and crossfire it would give my Nagas a better chance.  However, my mission goals were only to survive for 6 turns, not save the Nagas.  However, as damage is cumulative saving the Nagas for later would be important.  So my strategy was to use the infantry to move foraward and bog down the Southern avalanche down the hill and use them to spot, along with my two Iggys targets for my Long-fang and Nash Nagas.  Gears would sweep up anything that got through the infantry.


View from Southern Deployment Zone


 Switching caps to the North, I found that my units although well equipt, needed to close the distance to be effective and that would be an issue if I didn't find a way to punch through the Southern infantry.  As soon as the Southern infantry advanced I knew I had to keep the "lines"  somewhat in the middle of the battlefield.  If not I would not have room maneuver or range the enemy Nagas.  So, goal one stop the Southern infantry, goal two bypass with gears and Armor killers to get to the prize.  
View from Northern Deployment Zone
 After Turn 1, I found that the Southern troops were not as defenseless and easy as I forecasted.  Coordinated fire and IF pulverized the Northern Razorback as it moved forward to get a shot.  Also, as a large amount of the infantry are armed with just assault rifles or MGs they can't really effect the gears, and the gears are loaded out to kill heavies so like wise they can't kill infantry effectively.  I can see that the middle plateau of this battle field is going to be strewn with dead infantry and broken gears very quickly.  I think though the strategy for both sides would change dramatically if they did have only one squad of each type of infnatry.  This would allow for some much more dramatic moves.  The BNorth does have one badger to ferry the Heavy Infantry, but since I upgraded them to a platoon, I would have to ferry four squads now back and forth....I still could I guess, but the AGRs are in a good position shooting down from 2 elevation levels above aining that +1 already to cancel out range degradation....hmm  We'll see in Turn 2.

End of Turn 1
Too be continued.......

Thursday, August 1, 2013

Heavy Gear Campaign: Operation Sudden Fire Scenario 1 (Mission 1): Block and Run (Solo)

I spent a lot of time trying to figure out the comparable army lists for this scenario pack, but in the end I gave up.  Using cards from different lists and I just gave each side 2 CPs for the scenario.  I started this scenario on the last entry, but the wife interrupted and I was unable to finish this really fun scenario until today.  First off, playing solo was much more rewarding this time than any time in the past.  I fought each side really aggressively....as casualties will show.  I didn't keep the mission objectives in mind though and this cost both sides gears which will be missed later.  This highlights the importance and types of tactics used in a single game versus a campaign.  I did use a dedicated die roller which ensured I was not cheating.  She rolled the dice constantly for over 45 minutes on and off....

So we left off on turn 2.  Turn three was a good indication of the bloodbath that was beginning.
North won initiative and opted to let the South move first.  The Iggy and Dart in the west decided to try and run to rejoin the rest of the cadre in the east after successfully drawing three of the Northern gears to the west.   The Iggy was gunned down in the open as it about to reach cover by a Jaguar.  Luckily the pilot rolled a 6 and ejected safely.  The pilot scampered tot eh woods and was last seen riding off the field to  the north on a stolen tractor.  The Dart seeing its faster comrade in front erupt into flames, abruptly  returned to the hill for cover.

In the east the Southern gears enacted a pincer move which had mixed results.  The Iggy moved around the eastern side of the hill catching the Jag in crossfire.  The Mamba stormed over the hil and through the slot to pound the Jaguar to smithereens.  However, the Dart which went around the western side got a RFB shot in the face from the Strike Cheetah.
One of the Northern Hunters cut through the woods and finished off the Dart with crossfire.  

Turn 4 started with North winning initiative again...(I wasn't rolling)...  They opted to go first with some juicy targets available.  The Hunter in the woods blew a big hole in the back of the Mamba (no didn't have the upgraded back...oopps)  The Mamba attempted to flank the wary Cheetah,but was caught and blown to pieces by the Cheetahs RFB.  The Iggy in the east tried to chase down the Cheetah, but fumbled its perfect LRP shot into the Cheetah's back.  A this point the North could have possibly sealed the fate of the South by killing the Iggy, but instead focused on the Dart stuck to the southwest. 

   The Jag and the Hunter in the west had been working to get crossfire and eliminate the cover the lone Dart was effectively using on the hill to the south.  The Dart let fly with a lucky shot salvo of LRPs and decimated the Hunter as it moved through the open to the north of the hill.  Then the next turn it stunned the Jag with a HG and continued to hold off the 2nd Hunter as it approached from the NE.  In a last desperate attempt to rejoin the Iggy to the NE it sprinted to its death NE of the hill.

The Iggy in the east still persisted in catching the Cheetah and blew away the little nuisance once and for all with its LRPs just SW of the hill.

At this point the distance between the remaining Southern Iggy and the two Northern gears was so great that the North would never be able to catch the Iggy as it escaped North.  So the Southern intel analysts will be extremely happy with today's outcome.  Unfortunately it cost the South 4 gears and 3 pilots.  The Northern squad lost sight of its objectives and in an attempt to destroy gears rather than wear them down and prevent there escape failed to keep the South from winning the engagement.  The North lost three gears and pilots.

So South +2 VP for escape,  North 0 VP  On a random roll the South chooses scenario 7...In and Out

Wednesday, July 31, 2013

Heavy Gear Campaign: Operation Sudden Fire (Solo)

After a long hiatus, I have been able to touch and even play with some of my miniatures.  I have three things on my plate Heavy Gear wise.
   1) I am playing a campaign (Op Sudden Fire), on e of the old HG Tactical Scenario Books.  The campaign covers the survival of a Southern MILICIA company size element which had its regiment destroyed in poorly planned attacks on Northern outposts in the northern Badlands.  I am in the middle of the first scenario, where a Southern long range reconnaissance unit is trying to escape back to base with vital information.  They have been jammed by Northern elements and have no choice but to barrel through a Northern counter reconnaissance force.  I also decided to try using cards this time instead of the printed out army lists.


2)  I am working on Fleet scale task forces to use on the WH40K planet scape tiles.  The goal is to use the fleet scale as pieces on a campaign map to maneuver and accomplish objectives.  Of course each piece will relate to a unit and have a corresponding army list.  This will be another future goal.

3)  I am working on converting another HG Tac scenario book (The Two Towers) to Blitz for use in a campaign with a friend.  In order to dispense with the TV counts and very detailed balancing to have a total force pool of 8 combat groups.  No more than 50% can be veteran.  Damage and losses will felt as the campaign progresses as there will not be replacements, and only limited repair possibilities. 

Sunday, May 26, 2013

X-Wing Game 150pts

A Rumble in the Asteroid Field

Luke with two Red Squadron pilots and Arvel Crynyo and his Green Squadron wingman ran into a mess of ties and tie interceptors while sweeping the asteroid field.


Needless to say in the end very few fighters flew away unscathed.  Pretty much a big mess of a game.  Its easy to play solo, but hard at the same time.  If terrain is complicated it can really slow things down.

Tuesday, May 21, 2013

Warzone miniatures...I mean my new Venusian infantry for Jovian Chronicles

I just got back my Misihima minis today and they look awesome.  Space samurai!  These will be great for the Japanese themed Venusians I need when I do boarding actions in Lightening Strike.


Saturday, May 4, 2013

Xwing First Impressions

I have been holding back involving myself in another game, but not well enough it would seem.  I went to an X-Wing by Fantasy Flight demo today at Armchair Adventurer.  The game was actually very simple to learn and in no time we were in a furious dogfight.
Comments:
 - Movement - I really like the maneuver mechanism.   The predetermined maneuvers, which are differentiated by ship type, allows for accelerated game play.  Instead of waiting for the other player to move and decide what to do next, the moves are decided at the same time and then executed seamlessly   I was surprised by how easily it played like this.  The various movement templates were also sensible and well designed for faster play.

- Combat - Wow, I couldn't believe how simple the combat was.  I really liked the way in which you just add or drop dice instead of modifying the die role numbers.  Speaking of which, there are not numbers.  The new trend of special dice, like Saga, does not use numerical values makes life much easier for the gamer.  It may not be as detailed a system, but it definitely makes for fun gaming.

Pictures from our first game today.  I destroyed all four tie fighters without a loss.  The 2nd game was not as successful.  In fact I lost an X-Wing in the 2nd turn.  Anyways, I walked away with the starter kit and got home to order some more rebel fighters....so much for the not starting into another game.

Tuesday, April 30, 2013

Leviathan Campaign: Scenario 2 [Shorta (6833)]


Hunting the Hunters           (Shorta Scenario 2)
                                                  After the  reconnaissance of the Shorta System on 28 APR 6833, Commonwealth Naval Command decided to commit forces to severally depleting the TOG Naval Raiding Sqdn (98790th) and Interceptor Groups (44244th) now confirmed to be operating in the system.  The purpose of this mission would be to reduce the TOG Naval units by 50%.  The Orbital Station (Skate) is to be ignored for future operations.  A Heavy Carrie Squadron was also directed to move to the Shorta system from Newport in a follow and assume role.
                                                  The TOG Legate, after the last incursion, felt it necessary to request a reinforcement Task Force, ASAP.  In the meantime, the systems Naval forces would be consolidated and committed en masse.
               

Game Setup
Using two map sheets the TOG and CW player enter Turn 1 from opposite ends of the map sheet.  CW moves first on the first turn and then imitative is rolled on all subsequent turns.
Forces
TOG: 
98790th Naval Raiding Squadron
1 Crusier Carrier
1 Crusier
3 Frigates
6 Destroyers

20988 Battleship Squadron (Ashen) Reinforcements Turn 4
1 Battleship
2 Cruisers
4 Frigates
3 Destroyers

Renegade Legion:  
10221st Renegade Patrol Squadron
2 Frigates
6 Destroyer

49008 Battleship Squadron (Heightened Fury)
1 Battleship
3 Cruisers
1 Frigate
4 Destroyers

203322 Heavy Carrier Raiding Squadron  (The Caralis Hustlers) Reinforcements not available until next scenario if necessary
1 Battleship Class Carrier
1 Battleship
2 Cruisers
4 Frigates
5 Destroyers

 Special Rules

TOG reinforcements arrive on Turn 4.
No in-scenario repair.  It is considered on-going.
All armor from past engagements repaired.
Victory Conditions

If RL forces are able to destroy %75 of the TOG 98790th Naval Raiding Squadron in 5 turns

Both sides gain 1 Campaign Victory point for destroying a CW/RL DD or FFG , 2 for a CA and 3 for a BB.

Sunday, April 28, 2013

Leviathan Campaign: Shorta System Action (6833) Update

Well, it took a long time for the results of the action to be communicated to Earth...about 5  months!
Anyways, if you want the background look in Oct 2012 posts...


     The CWS Pometia and CWS Longula began their run for T-Space as soon as the repairs were complete.  Unfortunately, the TOG patrol from caught the Commonwealth ships as they spooled up their drives to escape.  The The INS Masada, INS Tapae and INS Cannae from the 98790th Naval Raiding Squadron. The TOG ships charged right up behind the the Renegade ships fire their spinal mounts right into their exhaust pipes.  Damage to the rear armor was complete, annihilating huge chunks of the ships aft sides.  The damage however, did not penetrate any critical systems, allowing the Renegade ships to accelerate away.  
    The Renegade ships took parting shots and launched their missiles as a last ditch effort to deter TOG pursuit.  The missiles were particularly effective and penetrated the shields and turret defenses of the Cannae, causing catastrophic damage resulting in the destruction of the Serpens class destroyer.  Laser broadsides slightly damaged the forward armor on both of the Fulgar class destroyers.  The next turn the Renegades won initiative and doubled power to the engines and reached escaped velocity.  So the Renegades escaped with their data from the recon and ships in tact.  TOG lost a destroyer, which would be easily replaced.


Monday, April 15, 2013

Terraform Farm Raid on Mars (Jovian Chronicles Mars Campaign One)

2214.1
  Mars, Xanthe Terra, vic Hell Station
Mission 1 (used HGB rules, charters tracked on Silhouette)
The Republic 4thSquad, Martin's Martian Raiders was tasked with disrupting Federation Terraforming operations in the region in an effort to draw forces away from the Seigpunkt section of the boarder region.  This feint would allow Rep forces time to preposition and recover from the continuous stagnated trench warfare of the Eastern Front.
The squad led by the quick and skilled gear pilot Jason W. led a surprise raid after and airborne infiltration to the east of the objective, named Haleiwa Staion 6.  Attacking in the early morning hours, the squad overran the station and its reinforced infantry platoon, incurring massive casualties and damage to key installations.  Their withdraw route after the raid took them to the south as they planned to exfil via the Valles Marineris region and to the south of Pavonis Mons.  The highly rocky terrain and wreckage from the collapse of the orbital elevator in the region coupled with the low population density would allow them a better chance of escape to the exfil point where other company elements would link up with them and cover their recovery by VTOL


Haleiwa 6 Station (Red blips from latest Intelsat flyby)


Fire support section  annihilates enemy infantry in the open (View from the SBF to the SE of OBJ)

Assault section flanks to the north of the OBJ as the SBF suppresses the Federation infantry.

Assault section clears the OBJ from North to South


The end for the beleaguered Federation militia

Now all he have to do is make it to the Exfil point...easier said than done.  Next time mission 2...

Saturday, March 23, 2013

Jovian Chronicles Campaign Overview


I have resolved to run a Jovian Chronicles Campaign.  The overall campaign will use VBAM for running the economic, financial and military elements at the strategic and operational levels.


Space:  Operational level syncs with Strategic in space and I will use the VBAM JC maneuver map for the solar system.  For larger naval battles, defined as involving two opposing capital ships, or more, I will use a combination of JC and Aerotech ships for fleets, with JC stats and then use elements for THW Star Navy for resolution since this will be all solo.  For smaller level engagements I will use JC skirmish rules and some Star Army I think.  For boarding actions, I will definitely use Star Army with Warzone/Starship Trooper/VOR/etc.  minis.


Ground:  Operational element as I will use WH40K Planetscape tiles for moving Bn+ elements and then when companies (-) engage I will play out using Heavy Gear gears and rules with PEZ concept from Star Army. This will really only be used for Mars, as it is the only divided planet at war right now in the JC story line.


I plan on starting out in around 2214, six months after peace negotiations began on Mars after the Battle of Kurtzenheim.  Federation troops with CEGA support are once again aggressively probing Free Republic areas.  Jovian support has been requested, but fallout from the losses sustained during the Kurtzenheim Fiasco still prevent full commitment of the armed forces.  A small contingent of Gear and Exo pilots and equipment, under the name of the JVG (Jovian Volunteer Group) are preparing to be infilled to provided limited, but much needed military support to the beleaguered  Free Martian Republic forces.  Elsewhere skirmishes with CEGA patrols seems to be on the rise and the Jovian military desperately operates with its hands tied to stop the CEGA advances before its too late.


Friday, March 15, 2013

Im back...what next


Ok, so once again I have proved that school and gaming just do not mix.  I have however, not been idle with my time.  I have quite a few opportunities coming up in the next two months so I intend on making the most of it.

First, I have, for better or worse, started into a new game, ..or rather an old game:  Warzone.


Although similar to WH40K, it seems to have more in common with VOR than 40K.  The setting is cool, he minis hard to find, but I got my hands on some, specifically Capitol, Bauhaus and Mishima.  These three armies can be easily used in some other settings and games as well, so I didn't see to much to worry about.
So now I ave a wide variety of Scifi troops with which to duke it out.  (AT43, Battletech Battletroops, Peter Pig Troopers, Starship Troopers, VOR, 40K Marines, Random assortment of Ral Parha Scifi figs not to mention a slew of various alien warbands).  So in trying to put these forces together and utilize them I have developing a plot to support a plan.
       I started on the idea of using the background from the book Jannisaries which describes how a 1960s era mercenary platoon is transported to a remote planet to join tribes of other humans from various cultures and histories.  So they fight Romans, Samurai, etc. with their weapons until the ammo runs out...   This could be interesting or too easy.

      So I think I will use a more SciFi -ish storyline.  The idea of mega corporations in Warzone is attractive as it could be melded with Jovian Chronicles very easily because it has a similar concept where each planet in the Sol System is occupied by a specific force.  So, I think that combining JC and Warzone might be the best haul.  Maybe an earlier war in the JC timeline so I can leave out the mecha (more complicated to deal with in skirmish battles), but then I could do boarding actions quite easily I think.  Hhhmmm....anyways, still debating.  Any recommendations, I would love to here then...that is if anyone reads this....
Next, With Jovian Chronicles I have resolved to get the fleet up and running.  I have a pretty large collection of ships and hey are going to go out to a painter...soon...I hope.  Thes along with my Aerotech ships and Firestorm Armada ships should be a large pool from which to pull ships and fighters.  Plan on using Star Navy rule set from THW.  Haven't tried them yet, but they look very adaptable.  But at the same time, I think a VBAM game to cover the campaign at the strat level using the JC VBAM system would be good.  Then for Tactical engagements I choose to play out I use Star Navy for fleet actions and Star Army for ground and boarding actions. Boy....this is looking confusing....  Well thats life in my SciFi world! 

Monday, February 4, 2013

Federation Commander BattleRep

First off, I was initially a little intimidated by the Combined "Reference Rulebook" I was using.  The organization was different and it took some adjusting to recognize how thins were laid out.  In the end though I found the game to be very,very easy...unless I totally screwed it up.

The Game:

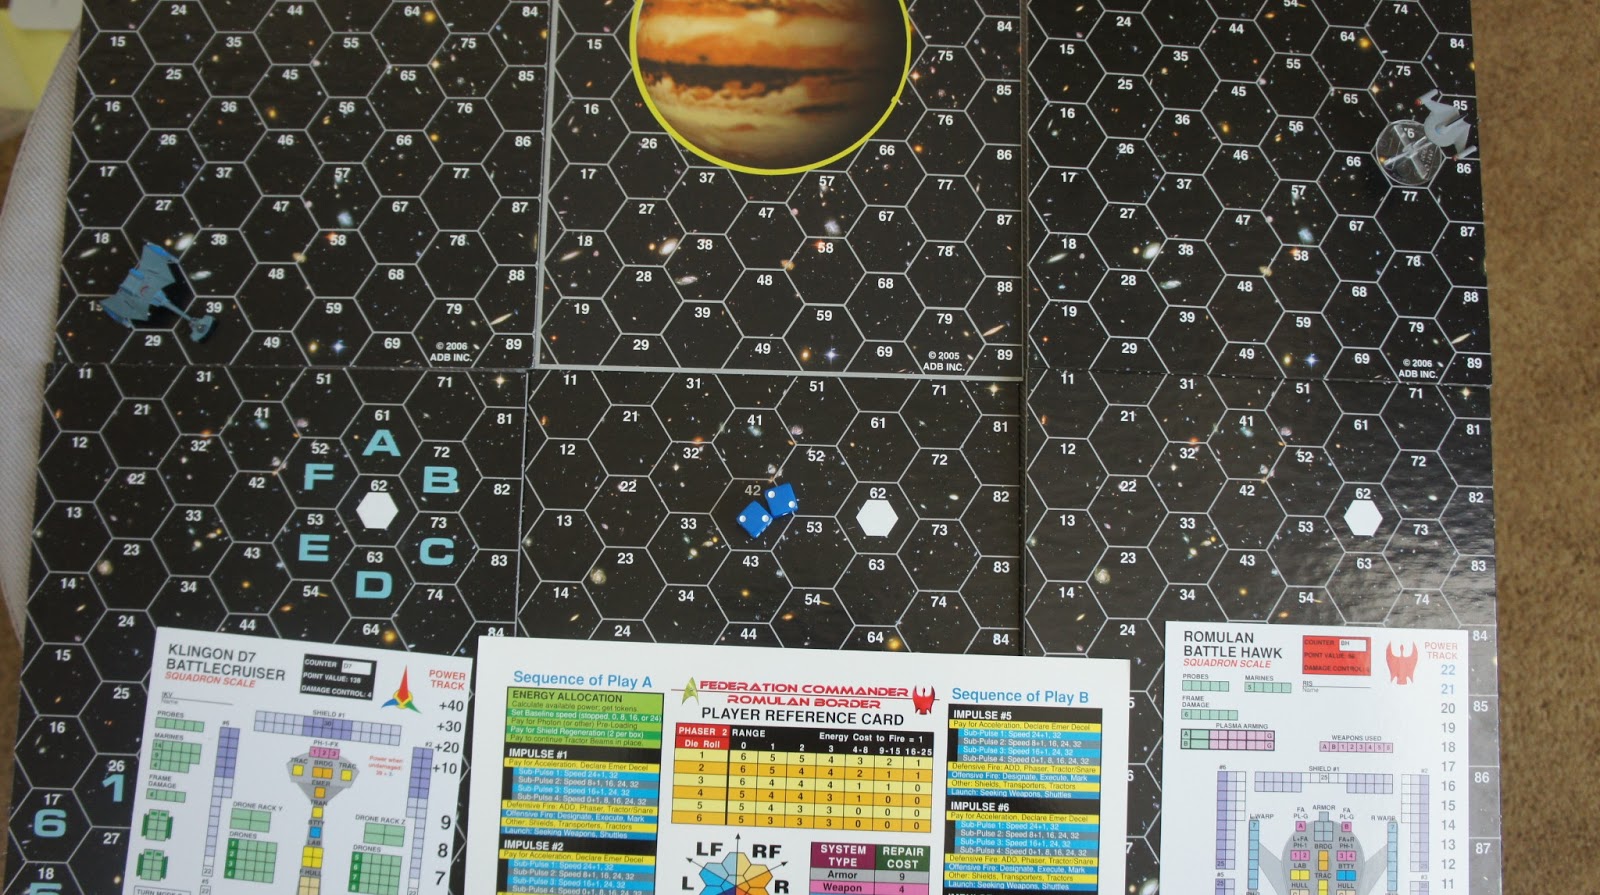
I set up a meeting engagement game focused on using Klingon and Romulan ships.  Although the point were a bit off on an exact match the game played out very well.

On the first side I had a lone Klingon D7 Battle-cruiser.  The energy was definitely a plus for the Klingons, because their ship is just bursting with weapons.  Maintaining even a speed of 16 it was possible to employ almost all the weapons each turn, until damage became a glaring issue.  The ship is surprisingly nimble and caught the Romulans on their turns quite often.  The only drawback was the lack of armor, which would have been great in stopping a couple of the burn-throughs scored by the Romluans which ended up taking out some key systems.  Otherwise, this ship is very dangerous and it would be smart to only engage with overwhelming maneuverability and firepower.

The other force was a pair of Romulan Battle hawks without cloaking capability.  I made this decision to negate some of the point disparity,but regretted doing so later.  The style of the ships, weaponry and capabilities are closely linked to their employment techniques.  I found that Romulans do not fair so well, even in pairs when the cloak option is taken away.  Alternating between ships being cloaked and decloaked from varying directions would have quickly disabled or destroyed the D7 in a much faster time.


In the end, it was too dangerous for either side to get too close without risking total destruction, so it became a mutual withdraw. 
Related Posts Plugin for WordPress, Blogger...